为了项目中方便使用,首先要把这三家push sdk集成到一个library项目中,并将通过广播接收到的推送消息统一分发到一个广播中,在主项目中直接引用此项目即可。
项目地址:JingoalPushDemo
集成很简单:
1.添加项目依赖
项目中导入pushlibrary,在主项目的build.gradle添加对libray项目的依赖:
compile project(':pushlibrary')
2.申请帐号
在三个平台注册开发者帐号,并创建自己的应用,获取所需要的appid、appkey等信息,华为的需要打包签名文件的SHA256值,这个在新建华为帐号的时候会有说明。
小米推送需要信息:APPID , APPKEY
个推推送需要信息:APPID , APPKEY,APPSECRET
华为推送需要信息:华为推送客户端不需要设置这些参数,只要保证包名以及打包签名文件的SHA256信息跟开发者平台配置的一样即可。
3.配置个推so库
下载个推的so库文件,放入主项目的libs目录下,并在主项目的build.gradle项目中添加依赖配置,位于android节点里面:
1 2 3 4 5
| sourceSets { main { jniLibs.srcDirs = ['libs'] } }
|
4.配置小米、个推的APPID、APPKEY信息
在defaultConfig节点下添加配置信息,下面配置中的**我是为了隐藏自己的信息的,有一个地方需要注意,小米的APPID和APPKEY都是纯数字,在配置的时候需要在前面加上\\0,切记。
1 2 3 4 5 6 7 8 9 10 11 12 13 14
| defaultConfig { ...(省略默认配置) manifestPlaceholders = [ GETUI_APP_ID : "lHv2qKvQNK9FCSlcL****", GETUI_APP_KEY : "Tcd6DHuozvAu7iQEl****", GETUI_APP_SECRET: "SaeqLmuJcy5xjNLz****", MI_PUSH_APPID: "\\028823037615175****", MI_PUSH_APPKEY: "\\0597175232****", PACKAGE_NAME : applicationId ] }
|
5.设置debug签名文件
这个是为了方便测试华为推送而设置的,如果你把默认签名文件的SHA256设置到华为推送配置中,就不用设置了。
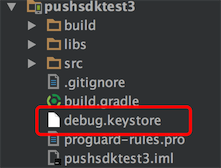
将debug.keystore拷贝到主项目目录下:

在build.gradle的android节点下添加配置:
1 2 3 4 5 6 7 8 9 10 11 12 13 14 15 16
| signingConfigs { debug { storeFile file("debug.keystore") } } buildTypes { debug { minifyEnabled false signingConfig signingConfigs.debug } release { minifyEnabled false proguardFiles getDefaultProguardFile('proguard-android.txt'), 'proguard-rules.pro' } }
|
6.清单文件中添加权限配置以及广播接收器
添加以下权限:
1 2 3 4 5 6 7 8 9 10 11 12
| <uses-permission android:name="getui.permission.GetuiService.${PACKAGE_NAME}"/> <permission android:name="getui.permission.GetuiService.${PACKAGE_NAME}" android:protectionLevel="normal"/> <permission android:name="${PACKAGE_NAME}.permission.MIPUSH_RECEIVE" android:protectionLevel="signature"/> <uses-permission android:name="${PACKAGE_NAME}.permission.MIPUSH_RECEIVE"/> <uses-permission android:name="android.permission.VIBRATE"/>
|
配置meta属性:
1 2 3 4 5 6 7 8 9 10 11 12 13 14 15 16 17 18
| <meta-data android:name="PUSH_APPID" android:value="${GETUI_APP_ID}"/> <meta-data android:name="PUSH_APPKEY" android:value="${GETUI_APP_KEY}"/> <meta-data android:name="PUSH_APPSECRET" android:value="${GETUI_APP_SECRET}"/> <meta-data android:name="MI_PUSH_APPID" android:value="${MI_PUSH_APPID}"/> <meta-data android:name="MI_PUSH_APPKEY" android:value="${MI_PUSH_APPKEY}"/>
|
添加广播接收器:
1 2 3 4 5 6 7 8 9 10 11 12
| <receiver android:name="com.jingoal.push.receiver.GeTuiReceiver" android:exported="false"> <intent-filter> <action android:name="com.igexin.sdk.action.${GETUI_APP_ID}"/> </intent-filter> </receiver> <provider android:name="com.igexin.download.DownloadProvider" android:authorities="downloads.${PACKAGE_NAME}" android:exported="true" android:process=":igepushservice"/>
|
7.接收消息
以上0-5的配置完毕之后就剩下最后一步了,在项目中创建一个广播接收器用来接收推送消息!
1 2 3 4 5 6 7 8 9 10 11 12 13 14 15 16 17 18 19 20 21 22 23 24 25 26 27 28 29 30 31 32 33 34 35
| import android.content.Context; import android.util.Log; import com.jingoal.push.receiver.JingoalReceiver; import com.jingoal.push.sdk.JingoalPushManager; import com.jingoal.pushsdk3.MainActivity; public class MyJingoalReceiver extends JingoalReceiver { @Override public void onReceivePassThroughMessage(Context context, String message) { Log.i("holo_push", "========================"); Log.i("holo_push", "透传消息: " + message); if(MainActivity.getInstance()!=null) { MainActivity.getInstance().setRecvPushMessage(message); } Log.i("holo_push", "========================"); } @Override public void onNotificationMessageClicked(Context context, String message) { Log.i("holo_push", "========================"); Log.i("holo_push", "小米消息: " + message); if(MainActivity.getInstance()!=null) { MainActivity.getInstance().setRecvPushMessage(message); } Log.i("holo_push", "========================"); } @Override public void onCommandResult(Context context, String command, boolean success) { Log.i("holo_push", "command :" + command); Log.i("holo_push", "command Result :" + success); if(JingoalReceiver.COMMAND_REGISTER.equals(command)) { Log.i("holo_push", "clientType: " + JingoalPushManager.getClientType() + ""); } } }
|
onReceivePassThroughMessage:用来接收华为和个推的透传消息。
onNotificationMessageClicked:因为小米推送在程序杀掉后无法接收透传消息,只能接收通知栏消息,所以这里集成的是通知栏自定义动作消息,就是在点击通知栏消息时我们客户端才能拿到真正的消息内容。
onCommandResult:用来接收客户端注册push,设置别名,删除别名等command的结果的回调,因为华为官方给出服务端的API已经不支持标签和别名,所以这个方法对华为无意义。
接收的Receiver也创建完毕,在清单文件中配置一下就OK啦:
1 2 3 4 5
| <receiver android:name=".receiver.MyJingoalReceiver"> <intent-filter> <action android:name="com.jingoal.push.receiver.jingoalreceiver"/> </intent-filter> </receiver>
|
OK,现在运行项目,通过各开发者平台发送消息看能不能接收到吧。
注意:华为的开发者平台推送消息时要通过手机的IMEI号来推送,集成到项目中时,服务端要通过token来推送。
